

Sunday, March 20, 2011
{Pom Pom Door Ornament}
So many of you have asked about this cutsie little door ornament and in the craziness of being a new blogger, I realized that I didnt post a link to the tutorial! So you can either go here, or check my tutorials page for the link ;)

{bookshevles complete}
So I said that I would post the bookshelves for my little man's room and here they are! I think they turned out fab, and since he is not tall enough to reach the top shelf yet, I will decorate it.....Genius!


To see more of my shelves and to get the link to make them go HERE :)!


To see more of my shelves and to get the link to make them go HERE :)!
Friday, March 18, 2011
The Blog Guidebook
My friend Christine, at the Krazy Crafty Lady, posted about this site and I thought that it was so cool and so will you!
It is basically like a blogging resource where your blog can be listed!

Go Check it out here.

It is basically like a blogging resource where your blog can be listed!
Go Check it out here.
Thursday, March 17, 2011
{Michael's Dollar Spring Frame}
So I seem to make these for every holiday/season, but I just love them and the are cheap/easy, not to mention a great little filler for those bare places ;)


So here we go~
Supplies:
1. $1 Wood frame from Michael's
2. White, Cream or light brown acrylic paint
3. Burlap
4. Vinyl lettering
5. Spring fabric
6. Some sort of string to hang your "spring" banner
7. Glue gun
8. Any other embellishments you want.
Tutorial:
1. Start with taking the wood frames out of the plastic and painting just the edges that you will see, and the back if you are particular ;) Allow to dry


~and make sure your photographer gets a good shot of you crafting your heart out with a weird face!

2. Measure your burlap to be slightly larger that the inside of the frame, cut, and place inside the frame. The back edges of the burlap.


3. You have to take your burlap back out for this step, so maybe step 2 and three should be switched??! Trace your frame on the fabric, cut out and apply with a small layer of mod podge. (you make ink the edges if you wish!

4. Now to make your banner: cut out triangles of burlap and fabric and glue them together, and then glue them to the string of your choice. Then add your vinyl lettering.


5. Attach to the frame and embellish where you see fit! Also if you need the tutorial on how to make the flower on the center, let me know and I will post!

5. Decorate your home!

Wednesday, March 16, 2011
{Cheap Decorative Pillow}

I am back in action, and am working on tons of goodies to share!
But I first wanted to show you how super easy and cheap these pillows are. My bed room is ever changing. Comforter, sheets, decorations, you name it. I just cant decide what I want! So when I see a 350 thread count damask strip comforter for 7 bucks on clearance at Target.....I snatch it up!
Then I need some pillows....So I headed over to the napkin/place mat section and happen to find 2 place mats that would work perfectly for .98! Super stoked!

So I just ripped out a section of the seam, stuffed it with pillow stuffing from Michael's (at 40% off of course ;) and hand sewed the seam back up!

It turned out great I think, considering my bedroom will probably be different next month!
Thursday, March 10, 2011
M-I-A
So I have been MIA the last few days and I just wanted to defend why...........

These sweet little beauties have been sick and so have I!!!!....... But stayed tuned later today for an easy, cute, fun SpRiNg inspiration!
Love Sarah

These sweet little beauties have been sick and so have I!!!!....... But stayed tuned later today for an easy, cute, fun SpRiNg inspiration!
Love Sarah
Saturday, March 5, 2011
what??? ME??? YAY!
Remember my first guest blogging appearance over at Krazy Craft Lady? Welp, that cute spring door ornament is featured over at Women Who Do It All!!!!
Today marks the one week mark for my crafty little blog and I couldn't be more excited to be featured!
I am thrilled and was stoked to see her adorable blog! Check it out!
Today marks the one week mark for my crafty little blog and I couldn't be more excited to be featured!
I am thrilled and was stoked to see her adorable blog! Check it out!
Guest Blogger....!
Yahoo! I was asked to be a guest blogger over at the Krazy Craft Lady! I was so excited and honored to do a cute Spring tutorial so go check it out!

Wednesday, March 2, 2011
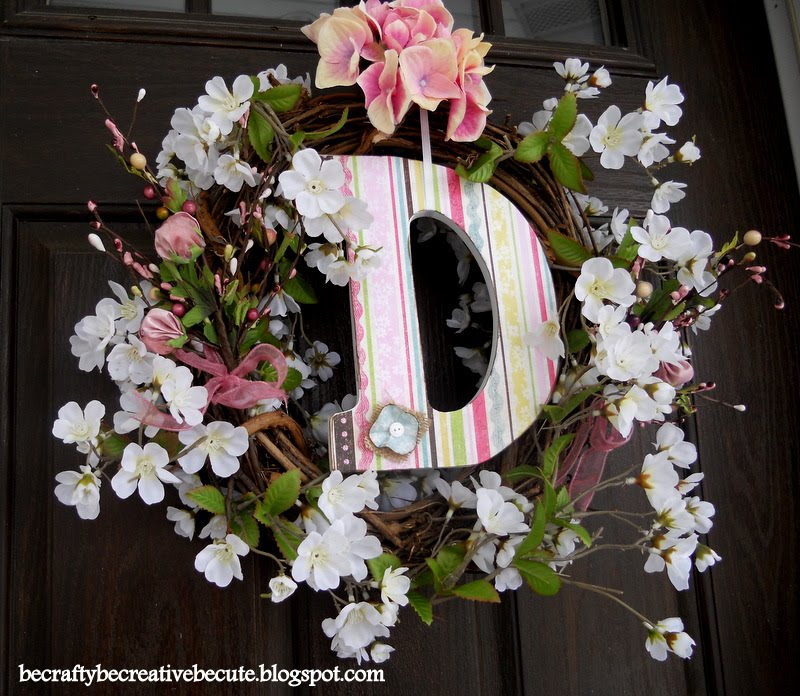
Are you ready for spring???
I sure am! So as my front yard is still covered in snow, I created this to help wish it away.....


So I'll get on with the super easy tutorial!
Ingredients ;)
1. One wood shaped letter of your picking (Michael's for 40% off...of course) See Rule #1 on my sidebar :) and go here if you need a coupon....
2. One Piece of coordinating scrapbook paper
3. Any embellishments you might like
4. One interchangeable viney wood wreath....(see rule number 2 on my sidebar;)
5. One apple blossom garland (grab another 40% off coupon;)
6. And a bush of flowers or just a single flower for the top. (I bought a bush and just cut a single flower of the bush and used the rest to fill up a spring vase :)
Tutorial
1. Trace the 'D' onto the scrapbook paper, mod podge it to the wood, and add a bit of distress ink to "cuten" it up!

2. Then add any embellishments to make it your own......

3. Next, take your apple blossom garland and wrap it around the vine wood wreath, removing any excess or flower that you don't love! Hook it into place however you like, but I like to use whatever makes it removable (metal wire) so I can reuse that wood wreath for another Holiday....ya, call me cheap, that's ok! But wouldn't you all agree that we love to make new things each year so this will probably not even be cute next spring! ......Then use a ribbon to attach the letter to your wreath...

4. Next, take the flower that you chose for the top, and stick it in place. Again, if you would like to reuse this wreath just make sure you can remove it!

p.s. I also threw in those "picks" i got last year at Michael's for 75% off... But feel free to add, take away, and most important, "Make it your own!"
LOOK at this Beauty! I bet we get spring weather in the next week....What do you say???!!!

Tuesday, March 1, 2011
Who is one of my most favortie Inspirations?
Let me introduce you to Make It and Love it...... She has been one of my favorites for a while now and if you visit her site I'm sure you will see why....
She has TONS of tutorials and is super creative. And her site is super easy to navigate. She also has tons of followers, so I'm sure you all know her...But I just wanted to give her a shout out, and post something I've made inspired by one of her tutorials...
So this is my little girls' nursery. Not too girly I might add ;)....


And those valances you ask? Where did I get them??? That's right... I made them from a tutorial here on Make it and Love it. I altered it a bit to make them small ones, but I am a BEGINNER sewer and I did it! So can you!

Anyway, go check her out, you wont be sorry!

Also she has a place to shop to buy patterns, etc.... Here....I LOVE her little boy ties :) !
She has TONS of tutorials and is super creative. And her site is super easy to navigate. She also has tons of followers, so I'm sure you all know her...But I just wanted to give her a shout out, and post something I've made inspired by one of her tutorials...
So this is my little girls' nursery. Not too girly I might add ;)....


And those valances you ask? Where did I get them??? That's right... I made them from a tutorial here on Make it and Love it. I altered it a bit to make them small ones, but I am a BEGINNER sewer and I did it! So can you!

Anyway, go check her out, you wont be sorry!
Also she has a place to shop to buy patterns, etc.... Here....I LOVE her little boy ties :) !
Subscribe to:
Posts (Atom)